picoCTF 2024 - Reversing Engineering Category solutions
Introduction
Hey everyone, hope you’re all doing well! Just wanted to share with you all that the picoCTF 2024 event took place recently. For those who might not know, picoCTF is a cool platform where you can practice solving different kinds of challenges to improve your problem-solving skills. It’s especially great for beginners.
In this writeup, we’re going to talk about how to solve all seven challenges in the reversing category. It might be a bit long, so grab a snack and let’s get started without any more delay!
Challenge 1 : Packer
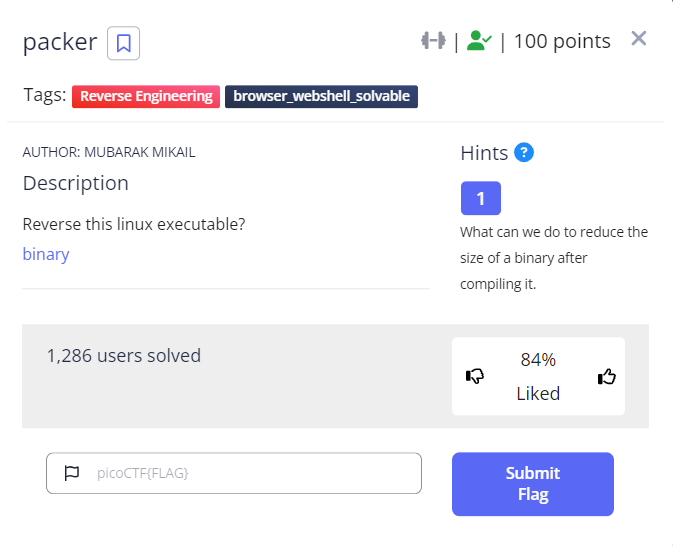
We are presented with a binary and the name suggests that the binary is packed, the description even mentions something about reducing the file size, which is a common behavior for packers.
Analyzing the binary
The first step I usually take when approaching any binary is to gather basic information about it.
Using the file command, we can see that it is a 64-bit Linux binary.

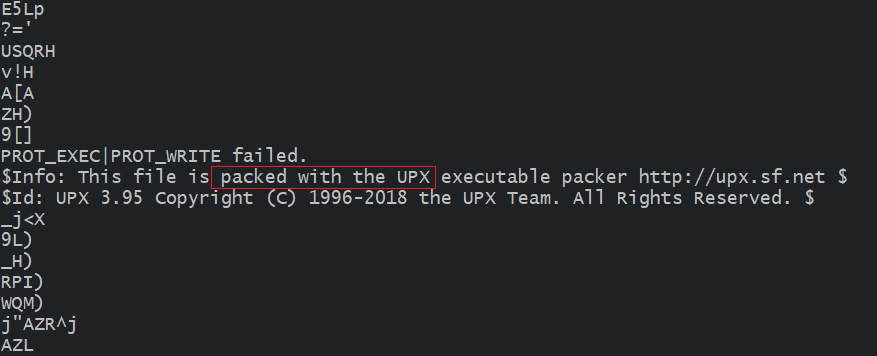
Next, the strings command is used to find strings as illustrated in the figure.
We can see that the file was packed with UPX indeed.
UPX Unpacking
Once we identify the packer, we can unpack the binary and proceed with the reversing process. For UPX unpacking, there are several ways to do it. The best way is to use the packer itself to unpack the binary.
According to UPX’s help menu, the -d switch can be used to decompress (unpack) the binary. I have appended another switch -k in this case to keep a backup of the original file.
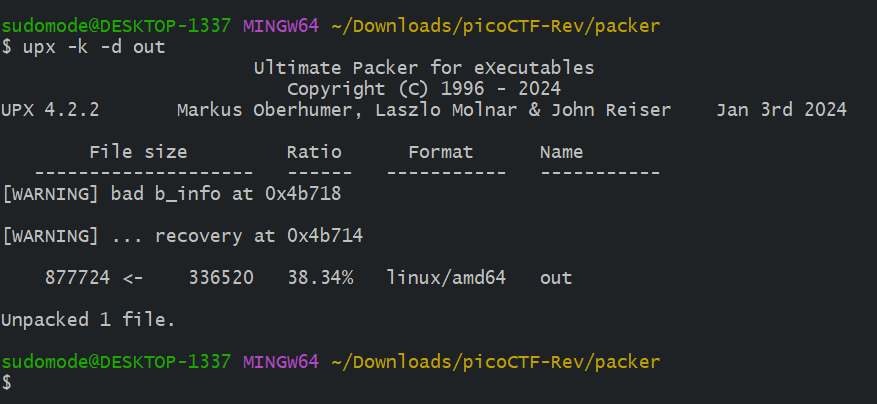
Great! The file is now unpacked , We can ignore those errors as they’re not important to us.
Solving Packer
Let’s load the binary in Ghidra , from the symbols tree we will navigate to the main function.
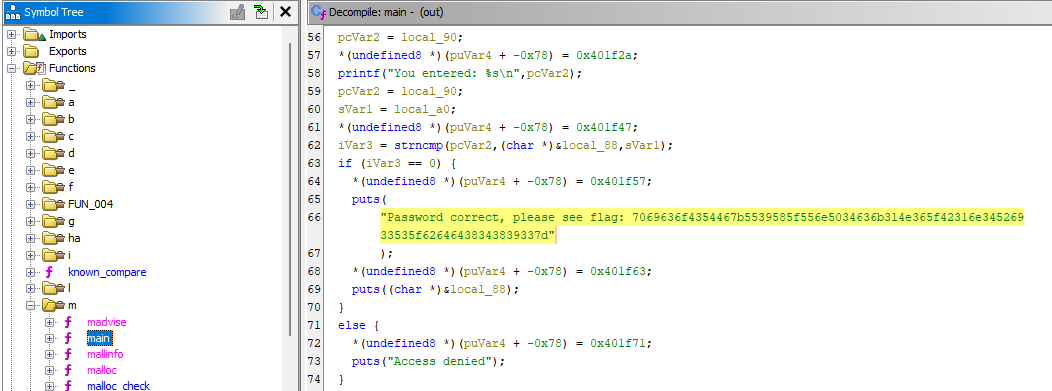
As we can see from the decompiler menu, a comparison is made, and if it succeeds, the flag is presented to us in hex format.
Once we decode it, we will get the actual flag.

Flag : picoCTF{U9X_UnP4ck1N6_B1n4Ri3S_bdd84893}
Challenge 2 : FactCheck

The second challenge called FactCheck ,The description says that the file is putting together some important piece of information , no hint was given so let’s dive in.
Analyzing the binary
using the file command again we can see that it is a 64bit linux executable

Decompile Time !
Upon loading the binary in IDA , We can spot the first part of the flag which is picoCTF{wELF_d0N3_mate_ .
for the remaining part , the result will be calculated based on several if statements.
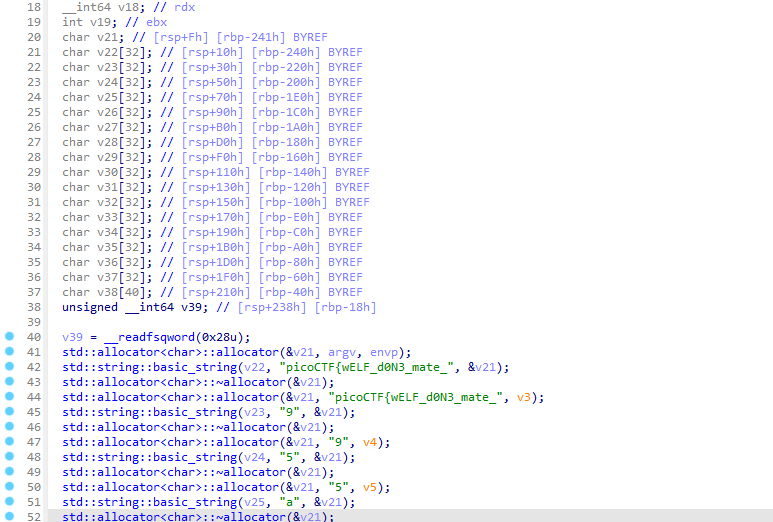
To get a better understanding of what values are being compared we need to rename the variables instead of refering to their declaration each time.
Solving FactCheck
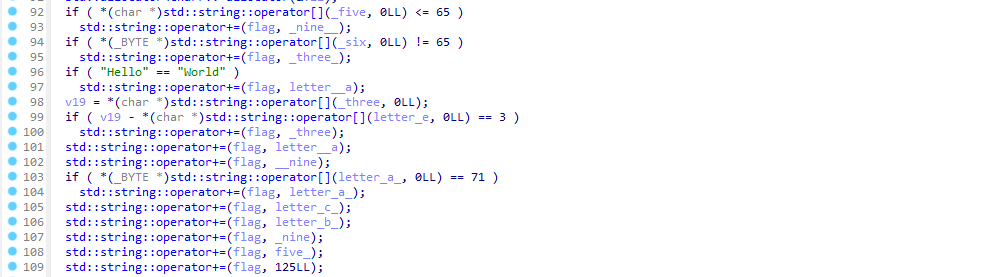
I have added a comment on each line to simplify the output
Okay , let’s break it down :
1
2
3
4
5
6
7
8
9
10
11
12
13
14
15
16
17
18
19
20

if ( *(char *)std::string::operator[](_five, 0LL) <= 65 )        // if ord(5) <= 65 -> True
    std::string::operator+=(flag, _nine__);                      // flag += "9"
  if ( *(_BYTE *)std::string::operator[](_six, 0LL) != 65 )      // if ord(6) != 65 -> True
    std::string::operator+=(flag, _three_);                      // flag += "3"
  if ( "Hello" == "World" )                                      // if "hello" == "world" -> False
    std::string::operator+=(flag, letter__a);
  v19 = *(char *)std::string::operator[](_three, 0LL);
  if ( v19 - *(char *)std::string::operator[](letter_e, 0LL) == 3 ) // if ord(3) - ord(e) == 3 -> False
    std::string::operator+=(flag, _three);
  std::string::operator+=(flag, letter__a);                      // flag += "a"
  std::string::operator+=(flag, __nine);                         // flag += "9"
  if ( *(_BYTE *)std::string::operator[](letter_a_, 0LL) == 71 ) // ord(a) = 71 -> False
    std::string::operator+=(flag, letter_a_);
  std::string::operator+=(flag, letter_c_);                      // flag += "c"
  std::string::operator+=(flag, letter_b_);                      // flag += "b"
  std::string::operator+=(flag, _nine);                          // flag += "9"
  std::string::operator+=(flag, five_);                          // flag += "5"
  std::string::operator+=(flag, 125LL);                          // flag += "}"
Bonus
Altough the challenge doesn’t require any coding to solve it , I wanted to showcase how we can replicate the main function in python which will print the flag at the end.
1
2
3
4
5
6
7
8
9
10
11
12
13
14
15
16
17
18
19
20
21
22
23
24
25
26
27
28
29
30
31
32
33
34
35
36
37
38
39
40
41
42
43
44
def main():
    v22 = "picoCTF{wELF_d0N3_mate_"
    v23 = "9"
    v24 = "5"
    v25 = "a"
    v26 = "3"
    v27 = "c"
    v28 = "9"
    v29 = "a"
    v30 = "e"
    v31 = "5"
    v32 = "d"
    v33 = "b"
    v34 = "9"
    v35 = "6"
    v36 = "b"
    v37 = "3"
    v38 = "8"

    # Check conditions and concatenate strings
    if ord(v24[0]) <= 65:
        v22 += v34
    if ord(v35[0]) != 65:
        v22 += v37
    if "Hello" == "World":
        v22 += v25
    if ord(v26[0]) - ord(v30[0]) == 3:
        v22 += v26
    v22 += v25
    v22 += v28
    if ord(v29[0]) == 71:
        v22 += v29
    v22 += v27
    v22 += v36
    v22 += v23
    v22 += v31
    v22 += "}"

    return v22

if __name__ == "__main__":
    result = main()
    print(result)
Flag : picoCTF{wELF_d0N3_mate_93a9cb95}
Challenge 3 : Classic CrackMe
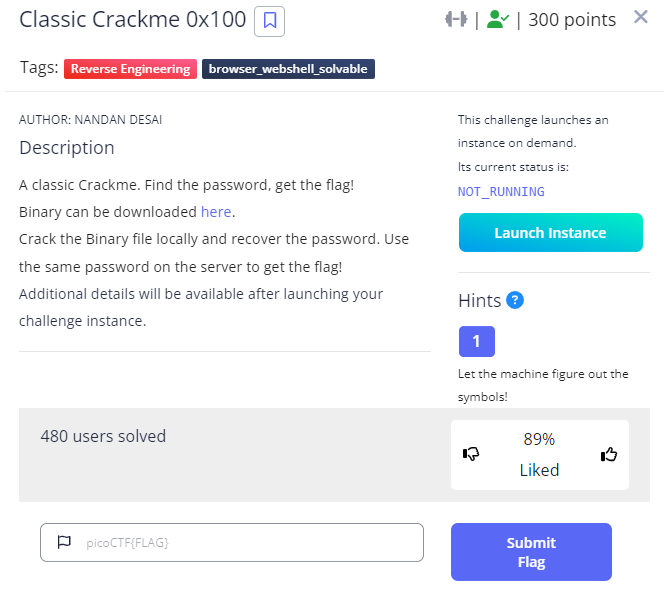
We are given a binary and the description says Let the machine figure out the symbols!
Let’s figure out what is waiting for us …
Decompling the executable
Loading the binary in IDA revleas the pseudocode of the main function.
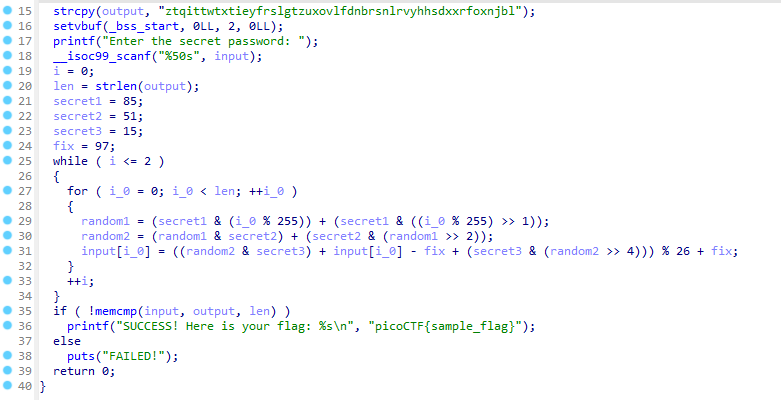
to get the flag we need to reverse the algorithm and the output should be equal to the same hardcoded string : ztqittwtxtieyfrslgtzuxovlfdnbrsnlrvyhhsdxxrfoxnjbl
I have ported the code to python to be able to manipulate and reverse the algorithm .
1
2
3
4
5
6
7
8
9
10
11
12
13
14
15
16
17
18
19
20
21
22
23
24
25
26
27

output = "ztqittwtxtieyfrslgtzuxovlfdnbrsnlrvyhhsdxxrfoxnjbl"

def main():
    print("Enter the secret password: ", end='')
    input_var = input().strip()

    len_input = len(input_var)
    len_output = len(output)
    secret1 = 85
    secret2 = 51
    secret3 = 15
    fix = 97

    for i in range(min(3, len_input)):
        for i_0 in range(len_input):
            random1 = (secret1 & (i_0 % 255)) + (secret1 & ((i_0 % 255) >> 1))
            random2 = (random1 & secret2) + (secret2 & (random1 >> 2))
            input_var = input_var[:i_0] + chr(((random2 & secret3) + ord(input_var[i_0]) - fix + (secret3 & (random2 >> 4))) % 26 + fix) + input_var[i_0 + 1:]

    if input_var == output[:len_input]:
        print("SUCCESS! Here is your flag: picoCTF{sample_flag}")
    else:
        print("FAILED!")

if __name__ == "__main__":
    main()
Solving Classic CrackMe
For this challenge, I’ll provide two methods of solving it. The first method involves reversing the code, as follows:
1
2
3
4
5
6
7
8
9
10
11
12
13
14
15
16
17
18
19
20

encrypted_str = "ztqittwtxtieyfrslgtzuxovlfdnbrsnlrvyhhsdxxrfoxnjbl"
len_input = len(encrypted_str)
secret1 = 85
secret2 = 51
secret3 = 15
fix = 97
i = 0

while i <= 2:
    for i_0 in range(len_input):
        random1 = (secret1 & (i_0 % 255)) + (secret1 & ((i_0 % 255) >> 1))
        random2 = (random1 & secret2) + (secret2 & (random1 >> 2))
        # Reverse Algo:
        decrypted_char = chr((ord(encrypted_str[i_0]) - fix - (secret3 & (random2 >> 4)) - (random2 & secret3)) % 26 + fix)
        encrypted_str = encrypted_str[:i_0] + decrypted_char + encrypted_str[i_0+1:]
    i += 1
flag = encrypted_str
print(flag)
Launch the instance , submit the password and you’ll get the flag.
Flag : picoCTF{s0lv3_angry_symb0ls_4656b68e}
- The second way to tackle the problem was by using angr to solve it faster. I hadn’t used angr before, so I had to figure out how to do it. As I worked on the challenge, I noticed that the output from angr was in raw bytes. Even though the serial was okay, I wasn’t completely satisfied because I wanted the output to contain only alphabets like the previous script.
I tried to use a constraint to achieve this, but I couldn’t figure it out with angr. That’s when I reached out to my friend Mohamed for help. He provided a solution to my problem. Big thanks to Mohamed for his help! 🙏 , Also I would like to Thank my friend karudo for providing help regardingangr🙏.
Solving the challenge using angr
For those who aren’t familiar with angr, it’s a Python toolkit for analyzing binaries. It combines static analysis with dynamic symbolic execution. If you want to learn more, you can check out their Github repository.
I’ve made sure to comment each line of the code so that beginners like me can understand what each line does.
1
2
3
4
5
6
7
8
9
10
11
12
13
14
15
16
17
18
19
20
21
22
23
24
25
26
27
28
29
30
31
32
33
34
35
36
37
38
39
40
41
42
import angr  # Import the angr symbolic execution framework
import claripy  # Import claripy for symbolic expressions
import sys  # Import sys module for standard system-specific parameters and functions

BASE = 0x400000  # Define the base address where the executable will be loaded in memory

def main():
    path_to_binary = "./crackme100"  # Path to the binary executable

    # Create an angr Project object
    project = angr.Project(path_to_binary, main_opts={"base_addr": BASE}, auto_load_libs=False)

    # Define a symbolic bit vector 'flag' with size 8 bits multiplied by 50 (total of 50 bytes)
    flag = claripy.BVS('flag', 8*50)

    # Create an initial state for the symbolic execution with symbolic input 'flag'
    initial_state = project.factory.entry_state(
        stdin=angr.SimPackets(name='stdin', content=[(flag, 50)]),  # 50 is the length of the flag
        add_options={
            angr.options.SYMBOL_FILL_UNCONSTRAINED_MEMORY,  # Fill unconstrained memory with symbols
            angr.options.SYMBOL_FILL_UNCONSTRAINED_REGISTERS  # Fill unconstrained registers with symbols
        }
    )

    # Add constraints to the input 'flag' to ensure it contains only lowercase ASCII characters
    for byte in flag.chop(8):  # Iterate over each byte of the symbolic input
        initial_state.add_constraints(byte != b'\x00')  # Constraint: byte should not be null
        initial_state.add_constraints(byte >= b'a')  # Constraint: byte should be greater than or equal to 'a'
        initial_state.add_constraints(byte <= b'z')  # Constraint: byte should be less than or equal to 'z'

    # Create a simulation manager with the initial state
    simulation = project.factory.simgr(initial_state)

    # Explore the binary with constraints to find a target address while avoiding another address
    simulation.explore(find=0x401373, avoid=0x401389)

    # If a solution is found, print the input that leads to the solution
    if simulation.found:
        print("solution: " , simulation.found[0].posix.dumps(sys.stdin.fileno()).decode('utf-8'))

if __name__ == '__main__':
    main()  # Call the main function if the script is executed directly
Challenge 4 : WeirdSnake
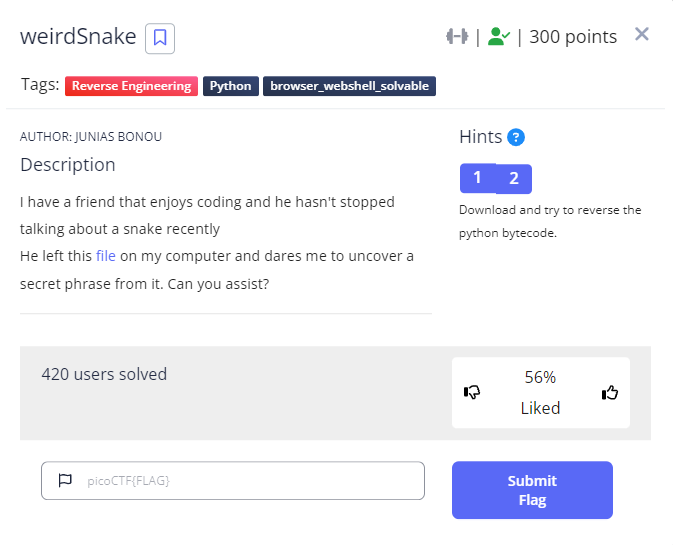
Based on the hint, it seems we’re dealing with Python bytecode. The second hint includes a link to the Python disassembler module. You can check it out at: Python disassembler module.
Basic Analysis
At the very begining a list of 40 element called input_list is created
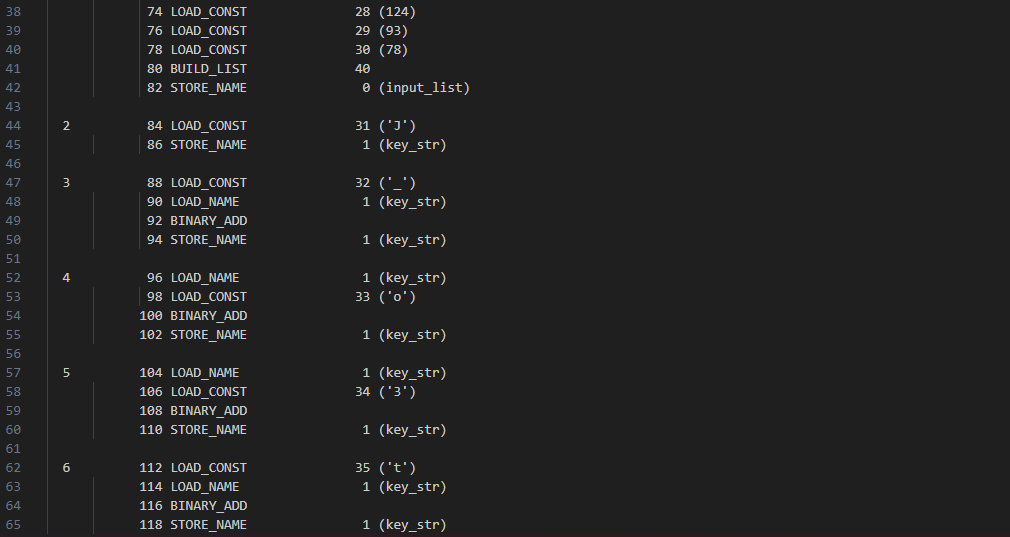
Then the characters J_o3t are pushed onto the stack , they’re loaded into variables and concatenated to be stored in key_str
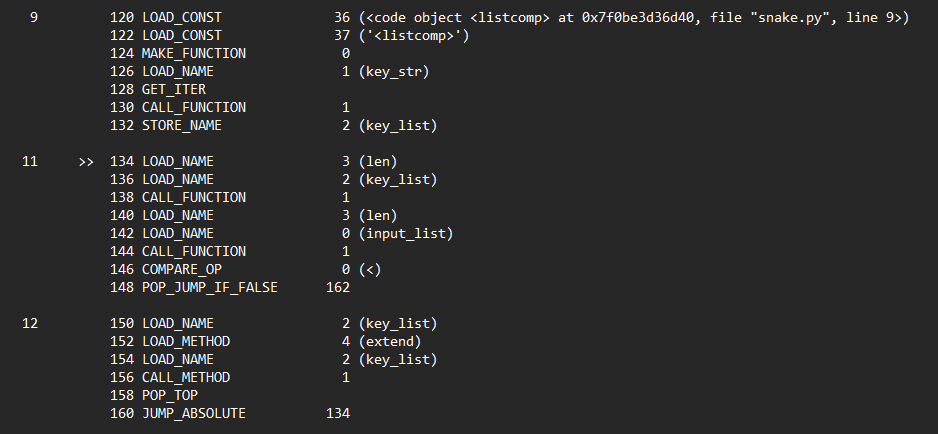
Next, the code will iterate through key_str using a list and store the result in key_list.
The length of the key_str list will be checked against the length of the input_list. If they’re not the same, the code will extend key_list until its length is equal to or greater than input_list.
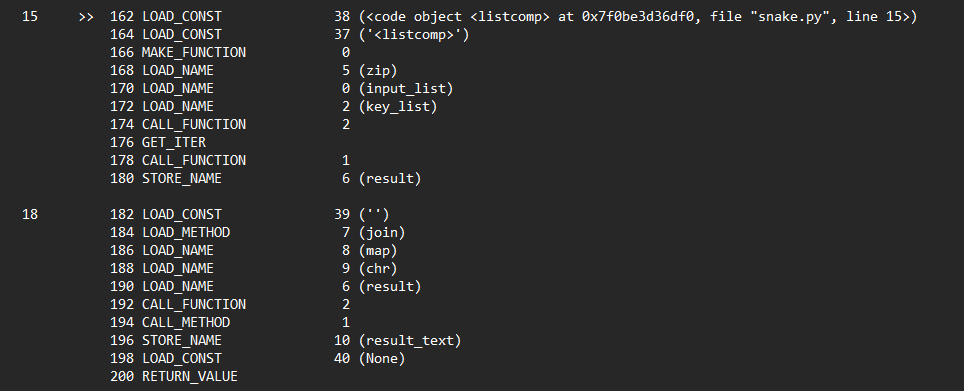
the bytecode above Zips input_list and key_list then joins the characters in the result into a string, storing it in result_text.
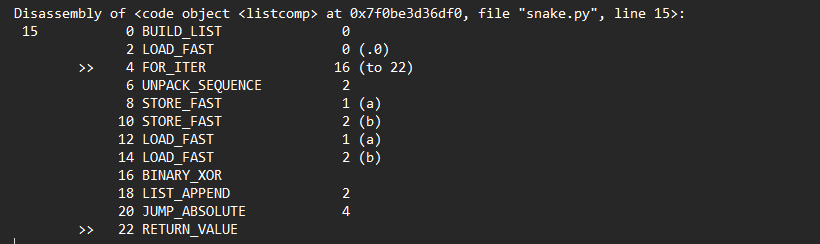
Finally , the lists will be XOR’ed using the BINARY_XOR bytecode !
I crafted a script to solve the challenge based on my initial analysis and got some garbage instead of the real flag.
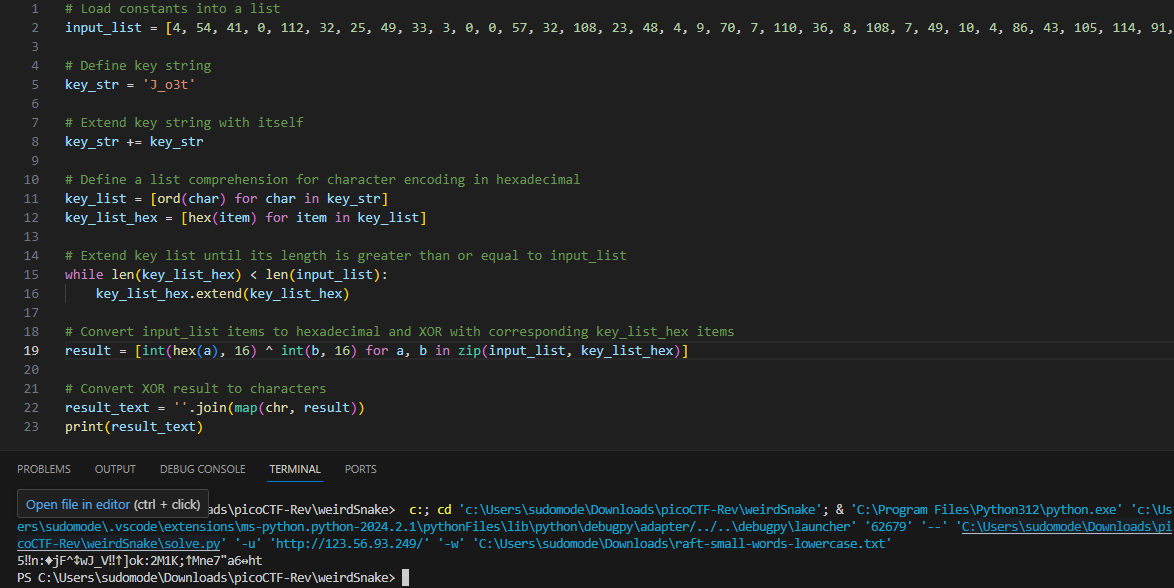
That’s when I had the Idea to bruteforce the key , since we know the charset used which is J_o3t the posibilities will be limited to 25 !
Solving WeirdSnake
1
2
3
4
5
6
7
8
9
10
11
12
13
14
15
16
17
18
19
20
21
22
23
24
25
26
27
28
29
30
31
32
33
34
35
36
37
import itertools

# Load constants into a list
input_list = [4, 54, 41, 0, 112, 32, 25, 49, 33, 3, 0, 0, 57, 32, 108, 23, 48, 4, 9, 70, 7, 110, 36, 8, 108, 7, 49, 10, 4, 86, 43, 105, 114, 91, 0, 71, 106, 124, 93, 78]

# Define charset for the key
charset = 'otJ3_'

# Function to brute-force keys
def brute_force_keys(start, end):
    found = False
    for length in range(start, end):
        for key_str in itertools.product(charset, repeat=length):
            # Get the ordinal values of characters
            key_list = [ord(char) for char in key_str]

            # Extend key list until its length is greater than or equal to input_list
            while len(key_list) < len(input_list):
                key_list.extend(key_list)

            # Zip input_list and key_list and XOR corresponding elements
            result = [a ^ b for a, b in zip(input_list, key_list)]

            # Convert XOR result to characters
            result_text = ''.join(map(chr, result))

            # Check if result starts with "pico"
            if result_text.startswith("picoCTF"):
                found = True
                print("Key found:", ''.join(key_str))
                print("Decrypted message:", result_text)
                break
        if found:
            break

brute_force_keys(1, len(charset) + 1)
Flag : picoCTF{N0t_sO_coNfus1ng_sn@ke_68433562}
Challenge 5 : WinAntiDbg0x100
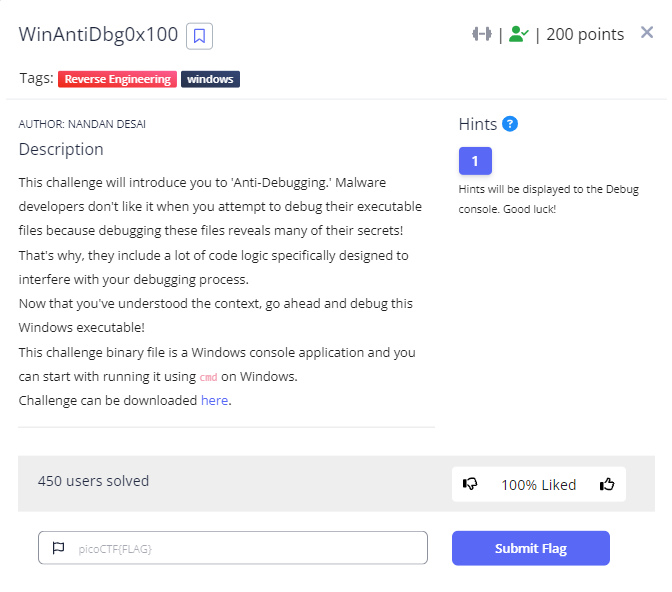
The challenge is windows console app which uses an anti-deubugging trick ,It is mentioned that hints will be displayed to the DebugConsole.
Analysis
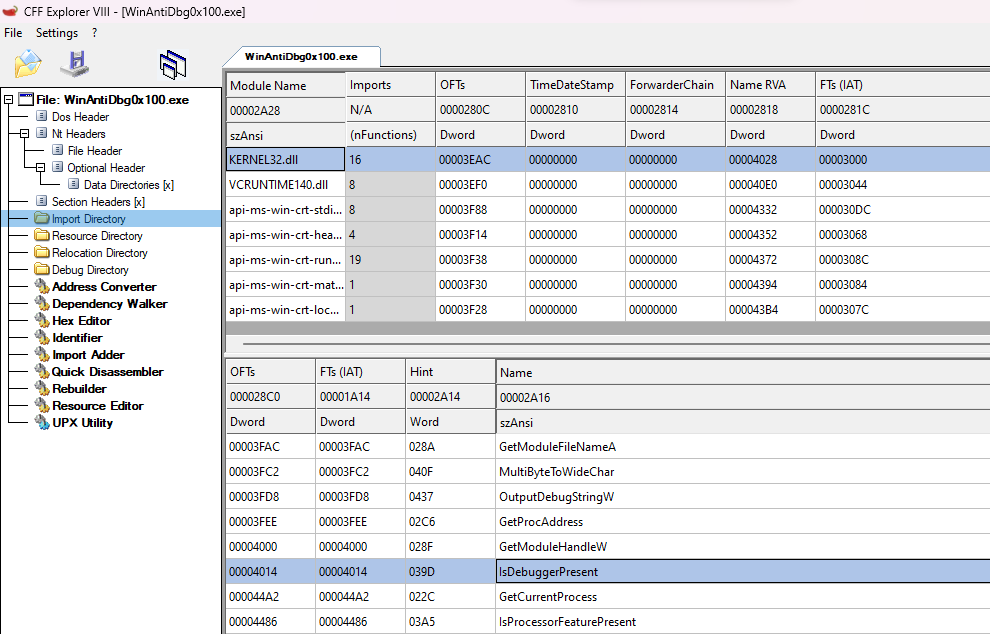
I like to use different tools, which is a good habit. It proves to be helpful when you suspect a tool might be broken or doesn’t produce the desired output. In this case, we’re going to use the old beloved CFF explorer for inspecting the binary nothing weird about this challenge just wanted to highlight the use of CFF explorer.
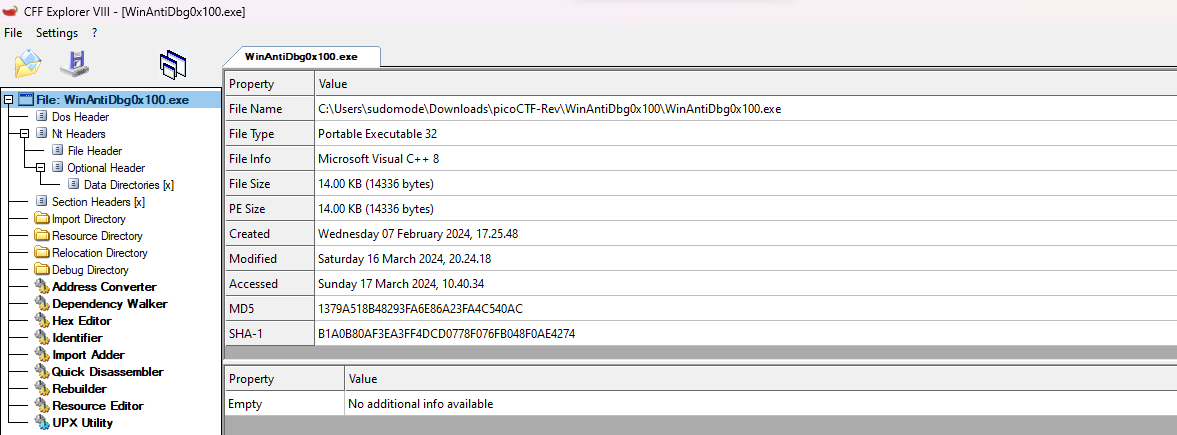
a 32 bit application written in C++ , nothing fancy, let’s proceed by examining the Import Directory We can see that the application depends on Kernel32.dll and other c++ libraries. Since the challenge is an Anti-Debugging challenge we can spot the use of IsDebuggerPresent
Solving WinAntiDbg0x100
Enough for now. Let’s jump into the debugger. I’ll be using x64dbg. Make sure the system breakpoint is unchecked, so we’ll break at the _entry, also known as _start. Step over using F8 several times and scroll down until you reach the main function call.

Hit F7 (STEP INTO).
I Highlighted the key parts of the main function , it basically reads config.bin , use OutputDebugStringW WinAPI to print messages to the Debugger Log window , after that it will check for the presence of a debugger and proceed with decrypting the config file if the debugger is not found .
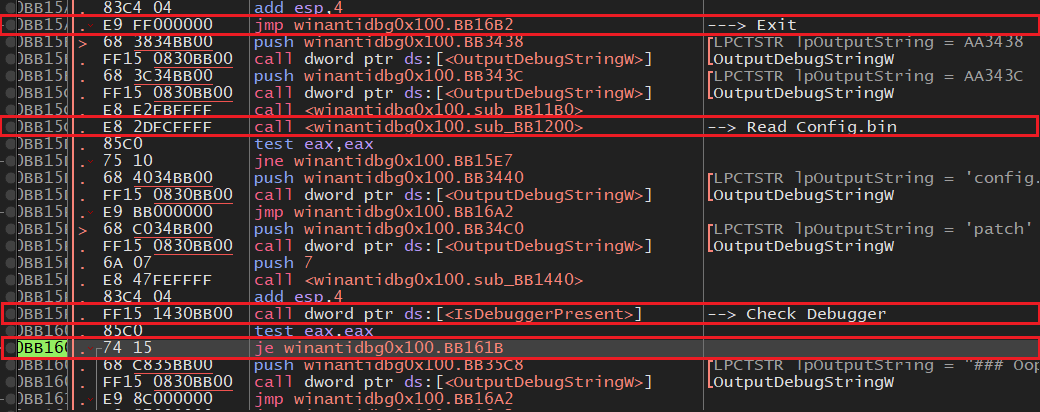
Now , there are multiple ways to solve the challenge , the easiest one is to change the ZF (zero flag register) , I decided to patch the binary by changing the assembly instruction from JE (Jump if Equal) to JNE (Jump if not equal) by Hitting space -> assemble and change the instruction.
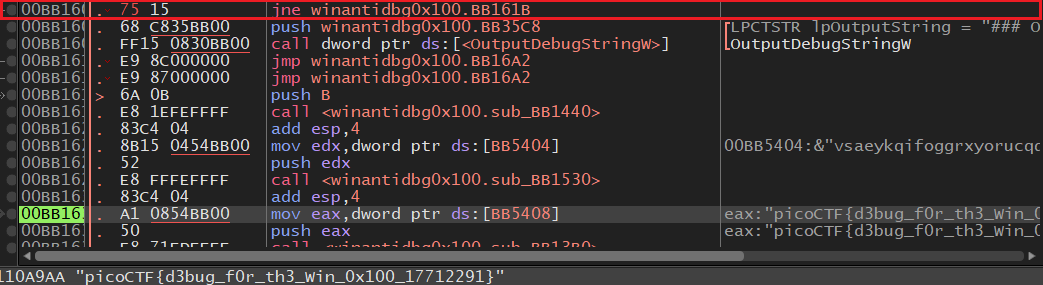
Proceed stepping using F8 and you’ll get the flag.
Flag : picoCTF{d3bug_f0r_th3_win_0x100_17712291}
Challenge 6 : WinAntiDbg0x200
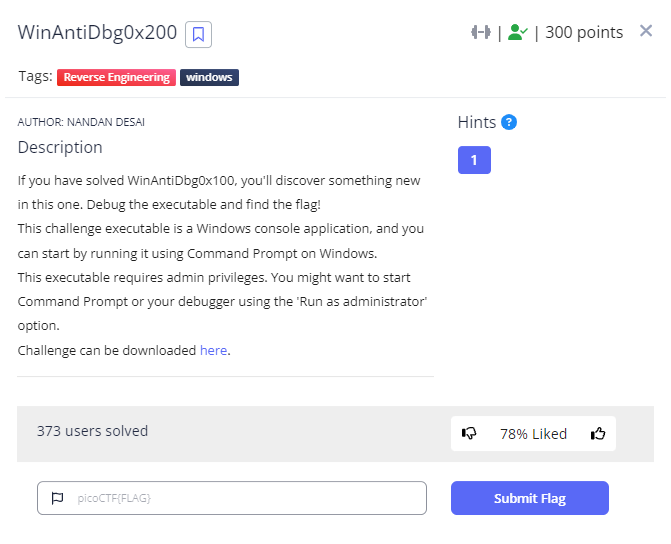
In this challenge we will do the same as the previous challenge , except that you need to patch the jmp to point to the decryption routine instead of jumping to the end of the function.
if you encountered some issues try to disable any anti-anti-debugging plugin including ScyllaHide.
Patched to become :
Solving WinAntiDbg0x200
Step through the code and you’ll get the flag
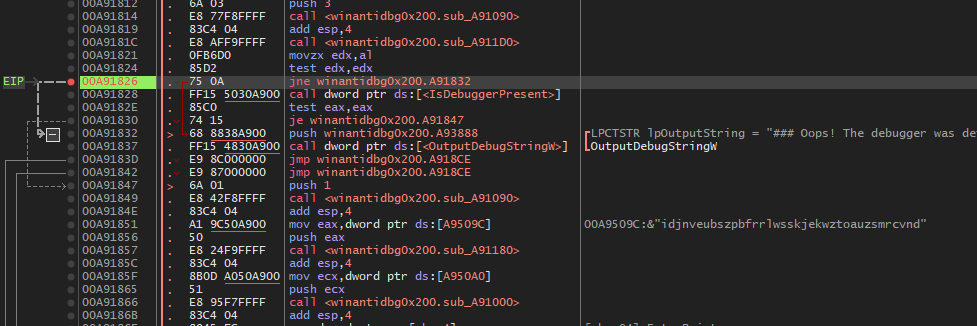
Challenge 7 : WinAntiDbg0x300
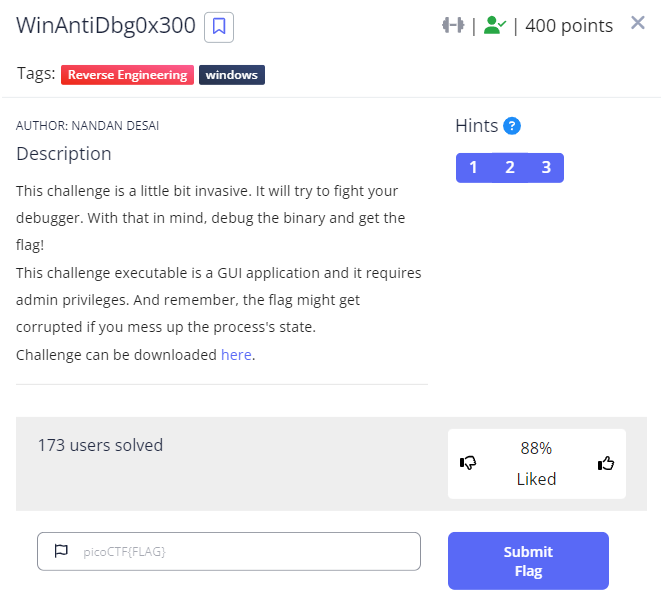
I will not rely on hints since I'm solving this in a creative way that won't involve discussing any patching or unpacking, Note that a pdb file is attached to the target to help solve the problem by giving the debugger the ability to detect debugging symbols and identify function names which we don’t need either.
Analysis
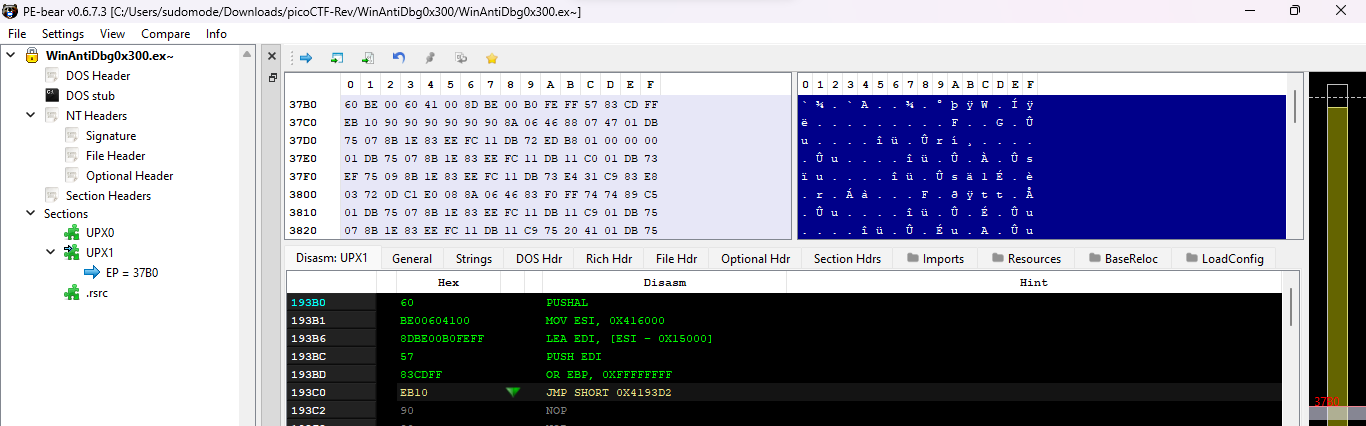
Opening the application in PE-Bear , we ca see from the sections header that the target is packed with UPX
Solving WinAntiDbg0x300
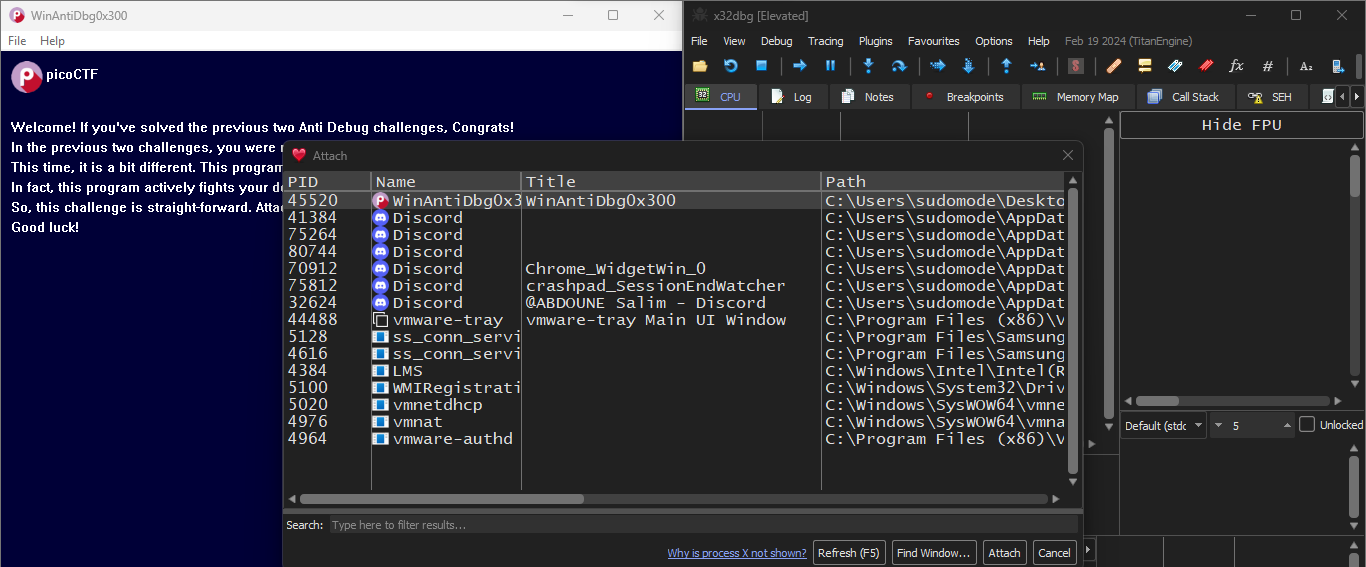
Remember to start the debugger as the admin user .
From the debugger menu select File -> attach and choose our executable
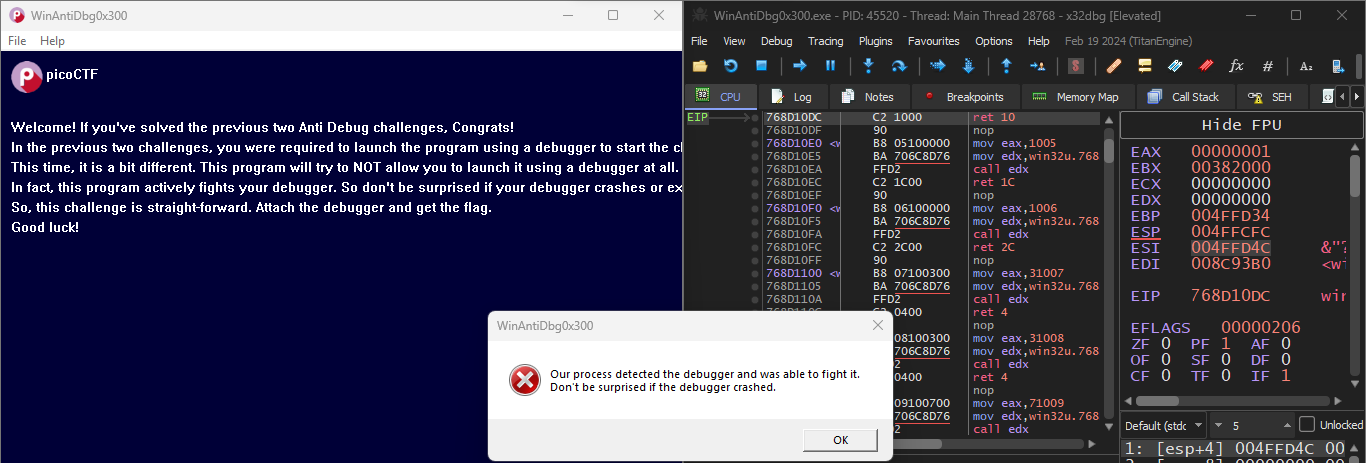
After attaching the challenge the debugger will be detected but that’s not an issue , the only thing that matters is that the executable is fully unpacked at runtime that means UPX is decompressed and the config.bin is read .
Next , We will pause the execution of the program and go to the symbols tab , select our module in this case winantidbg0x300.exe , double click and hit shift+D to search for strings in the current module.
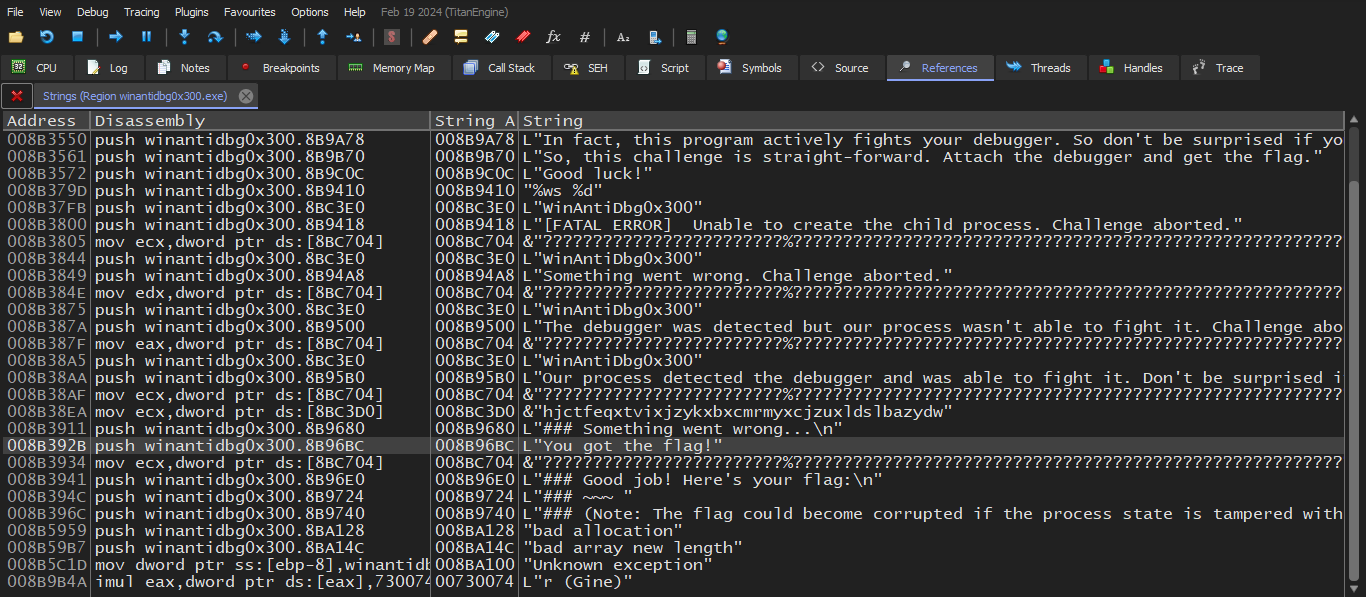
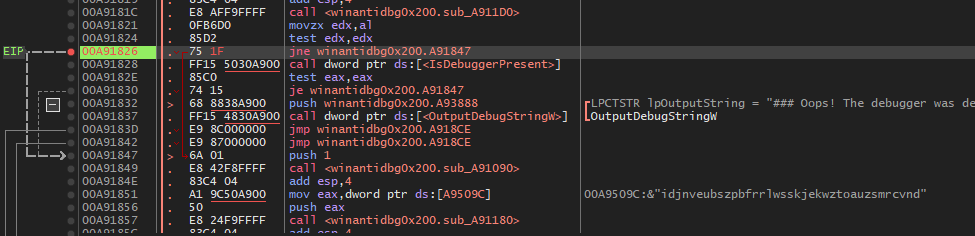
Scroll down until you reach you got the flag ! and double click it . we will land in in the function we’re interested in. then select the start of the decryption routine which start at the instruction push 1 , right click then choose set EIP here That should set the Instruction pointer to the current instruction we’re pointing at.

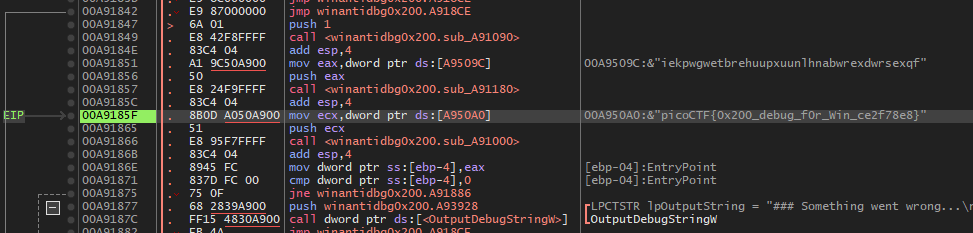
Keep stepping using F8 and the flag will be printed !
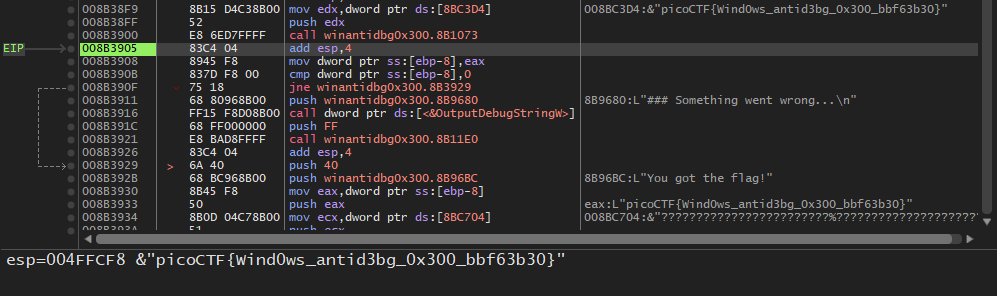
Flag : picoCTF{Wind0ws_anti3bg_0x300_bbf63b30}
That’s it for this writeup. I hope you liked it. If you have any questions, feel free to reach out to me on one of my social media accounts.